How to Match New Trim to Existing Woodwork in a St. Louis Home
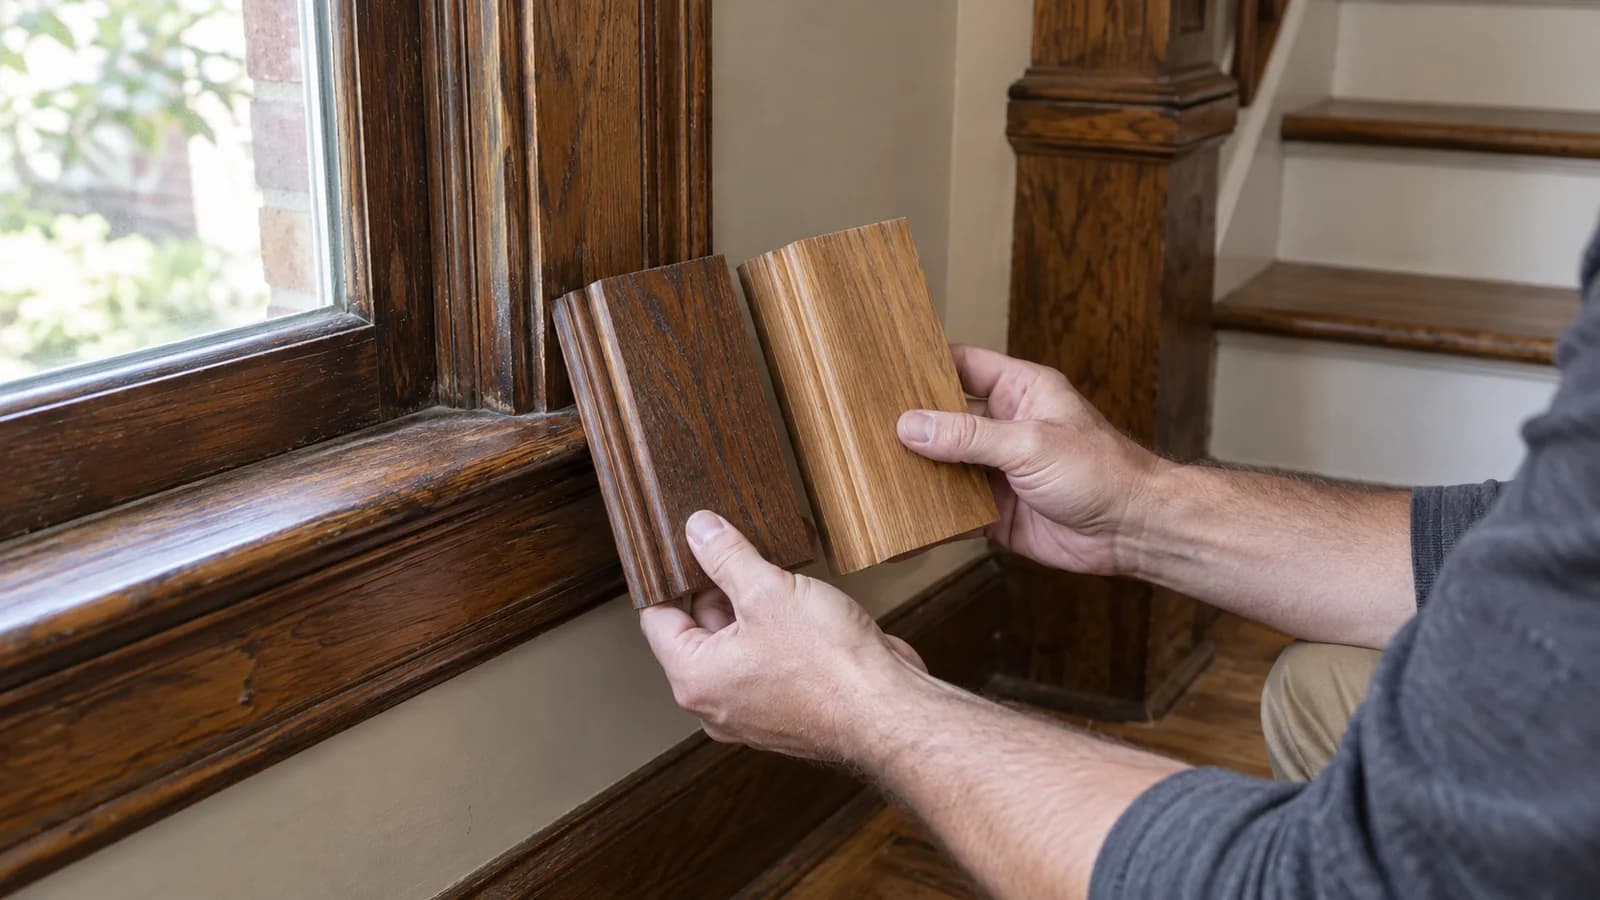
Matching new trim to existing woodwork takes more than finding a similar molding at the lumberyard. To get a convincing result, compare the original profile, dimensions, wood species, grain, color, sheen, and installation details. If an exact match isn’t practical, use a clearly intentional transition rather than installing trim that looks almost right.
At CTM Construction Services, we often approach custom carpentry projects by first studying what’s already in the home. That matters in St. Louis, where older houses may contain substantial baseboards, detailed window casings, paneled doors, and molding profiles that aren’t commonly stocked today.
Start With the Shape and Size of the Existing Trim
The profile is the cross-sectional shape of a piece of trim. It includes every curve, bevel, flat section, bead, and edge that you see from the end of the board.
Two pieces of casing can look similar on a product page yet appear noticeably different once they meet at a doorway. A small change in the depth of a curve or width of a flat section will affect how light and shadow fall across the molding.
Measure more than the overall width. A proper comparison should account for:
- Total width and thickness
- Depth of curves and recessed areas
- Size and location of beads or decorative lines
- Projection from the wall
- Relationship to nearby baseboards, plinth blocks, and corner blocks
- How separate pieces build up a layered profile
Many older trim assemblies consist of several pieces rather than one molded board. What looks like unusually wide casing could include a flat board, backband, decorative cap, and separate edge molding. Recreating the assembly piece by piece may produce a closer match than searching for one modern profile.
Use an Original Piece as the Best Reference
A clean cross-section gives a carpenter far more information than a photograph. Look for a loose piece, a removed section, or an inconspicuous area where the molding profile can be traced without damaging it.
If no sample is available, a profile gauge can capture the main shape. Detailed measurements and straight-on photographs also help, especially when the new trim will go in a different room.
Don’t rely on a single measurement taken from painted trim. Several layers of paint can soften details and make edges appear thicker. Check more than one location because old woodwork may have been repaired, altered, or replaced during earlier renovations.
The existing house itself often provides clues. A closet, basement stairway, attic room, or secondary hallway may contain a less-painted example of the original molding.
Decide Whether the Trim Needs an Exact Match
An exact match makes sense when new and old sections meet directly or appear within the same line of sight. It’s particularly important when replacing one damaged length, extending baseboard along the same wall, or adding casing beside an original opening.
You may have more flexibility in a separate room, on another floor, or inside a new addition. In those situations, matching the scale and overall character may matter more than copying every small detail.
The National Park Service’s rehabilitation standards recommend repairing distinctive historic features when practical and matching their visual qualities when replacement becomes necessary. Although those standards apply specifically to historic properties, the basic principle works well in any character-rich home: identify the details that define the space before changing them.
Near matches tend to cause the most trouble. A casing that’s a quarter-inch narrower than the original may look like a purchasing mistake. A simpler profile used consistently throughout a clearly separate area can look deliberate.
Match the Wood Species and Grain for Stained Trim
Profile and dimensions usually carry the most visual weight on painted woodwork. Stained trim demands closer attention to the material itself.
Different wood species absorb stain differently. They also have distinct grain patterns, pore structures, and natural colors. Applying the same stain to oak, pine, maple, and poplar won’t make them look alike.
Begin by identifying the original species as closely as possible. Then compare:
- Grain pattern
- Board color before staining
- Amount of natural variation
- Cut of the lumber
- Density and stain absorption
- Presence of knots or mineral streaks
The way a board was sawn affects its appearance. Flat-sawn oak shows broader grain patterns, while quarter-sawn oak has straighter lines and visible ray flecks. Choosing the right species but the wrong grain orientation can still create a noticeable mismatch.
Older wood has also changed with time. Sunlight, oxidation, cleaning products, and previous finishes can deepen or shift its color. Fresh lumber rarely matches aged trim as soon as it leaves the shop.
Test the Entire Finish, Not Just the Stain Color
A stain name doesn’t guarantee a color. The final appearance depends on the wood, surface preparation, application method, number of coats, drying time, and clear finish placed over it.
Make test samples from the same material planned for the project. Prepare them using the same sanding sequence as the finished trim, then view the samples beside the original woodwork in the actual room.
Natural and artificial light can reveal different undertones. A sample that looks neutral near a window may appear too red or orange under warm evening lighting.
Sheen matters too. Satin, semigloss, and gloss finishes reflect light differently, which can make two otherwise similar colors look unrelated. Compare the sample at several angles and during different times of day.
Once you find a close formula, document each product and step. Keep a finished sample with the project records for later repairs or additions.
Painted Trim Still Requires Careful Matching
Paint makes species and grain less visible, but it doesn’t hide an incorrect profile or poor installation.
Check the existing color under clean conditions. Dust, smoke residue, sunlight, and age can change the appearance of painted trim. A sample taken from behind hardware or another protected area may show the original color, but matching that hidden color could make the new work look different from the surfaces currently visible.
Decide whether to match the aged finish or repaint a larger connected area. If new casing joins existing baseboard, painting the complete assembly often creates a cleaner result than touching up a few isolated sections.
Use the same sheen where old and new trim meet. Slight sheen differences become especially visible around windows, doors, and other areas that catch angled light.
Surface preparation also affects the finish. Crisp new molding placed beside heavily painted original trim can look too sharp. Careful sanding, priming, caulking, and paint application should bring the pieces together without erasing the new profile’s detail.
Account for Walls, Floors, and Openings That Aren’t Square
Older homes rarely provide perfectly level floors or completely straight walls. Trim must fit the house as it exists.
A new baseboard installed level may expose an uneven gap above an old floor. Door casing can reveal that an opening leans slightly. Plaster walls may vary in thickness, particularly near old door and window jambs.
Finish carpentry addresses those conditions through careful fitting. Depending on the location, the work could require scribing a board to an uneven surface, adjusting a joint, extending a jamb, or using a small return that finishes an exposed edge cleanly.
These details separate trim that merely has the correct profile from trim that looks settled into the room.
If the work forms part of a larger residential remodeling project, plan the trim before changing walls, flooring, cabinets, or openings. Early decisions reduce awkward transitions and make it easier to carry consistent details through the finished space.
Know When Custom Milling Makes Sense
Stock molding works well when the profile is available and its proportions fit the existing room. Older or uncommon woodwork may require custom fabrication.
A carpenter or millwork shop can recreate a profile from a clean sample or measured drawing. Some profiles require a custom knife, while others can be built from several standard and custom-milled pieces.
Custom milling becomes especially useful when:
- New trim will connect directly to original molding
- Several doors or windows need matching casing
- The profile has unusual curves or dimensions
- Replacement sections must fit an existing assembly
- Stained wood requires a specific species and grain
- Stock options look noticeably undersized beside the original work
For one small, isolated repair, reproducing a complex profile may not make financial sense. A built-up solution or carefully chosen complementary profile could work better. The amount of trim, its location, and how closely people will see the transition should guide the decision.
Review the Match Before Installing Everything
Approve a short finished sample before ordering or installing the full amount. Place it against the actual wall, floor, doorway, or cabinet where the new trim will go.
Look at the sample from across the room, not only from a few inches away. The profile may match closely while the overall scale feels wrong. Color can also shift once a longer section reflects more light.
Check how the sample relates to nearby features. Baseboard height should make sense beside door casing. Crown molding needs enough visual weight for the ceiling height. Window trim should sit comfortably with the sill and surrounding wall space.
A small mockup gives you time to correct the profile, color, or sheen before those differences repeat throughout the room.
Plan New Trim Around the Whole House
To match new trim to existing woodwork successfully, start with careful documentation and decide where accuracy matters most. Copy the full profile where old and new work meet, pay close attention to species and grain on stained wood, and test the complete finish in the room.
In a separate space, a compatible trim package may look better than an imperfect copy. Keep the proportions related, repeat a few recognizable details, and create a clear transition between the two areas.
CTM Construction Services handles trim and molding installation, doors and window casings, woodworking repairs, refinishing, and other custom carpentry in the St. Louis area. If you’re adding trim during a remodel or trying to connect new work with an older home, contact our team to discuss the existing details and where the new material needs to go. A sample, a few measurements, and a close look at the surrounding room will usually reveal the right direction.
Recent Posts
How to Update a Home Without Making It Feel Too Trendy
AUGUST 25, 2026
Basement Conversion Ideas for St. Louis Homes
AUGUST 19, 2026
Woodwork Repair vs Replacement – What Makes Sense?
JULY 27, 2026
How Built-In Storage Can Make a Small Home Work Better
JULY 6, 2026
Sunroom Addition in St. Louis: What Homeowners Should Think About
JUNE 20, 2026
Newsletter
Don't miss a thing!
Sign up to receive daily news