Why Are There Gaps Between My Crown Molding and Ceiling?
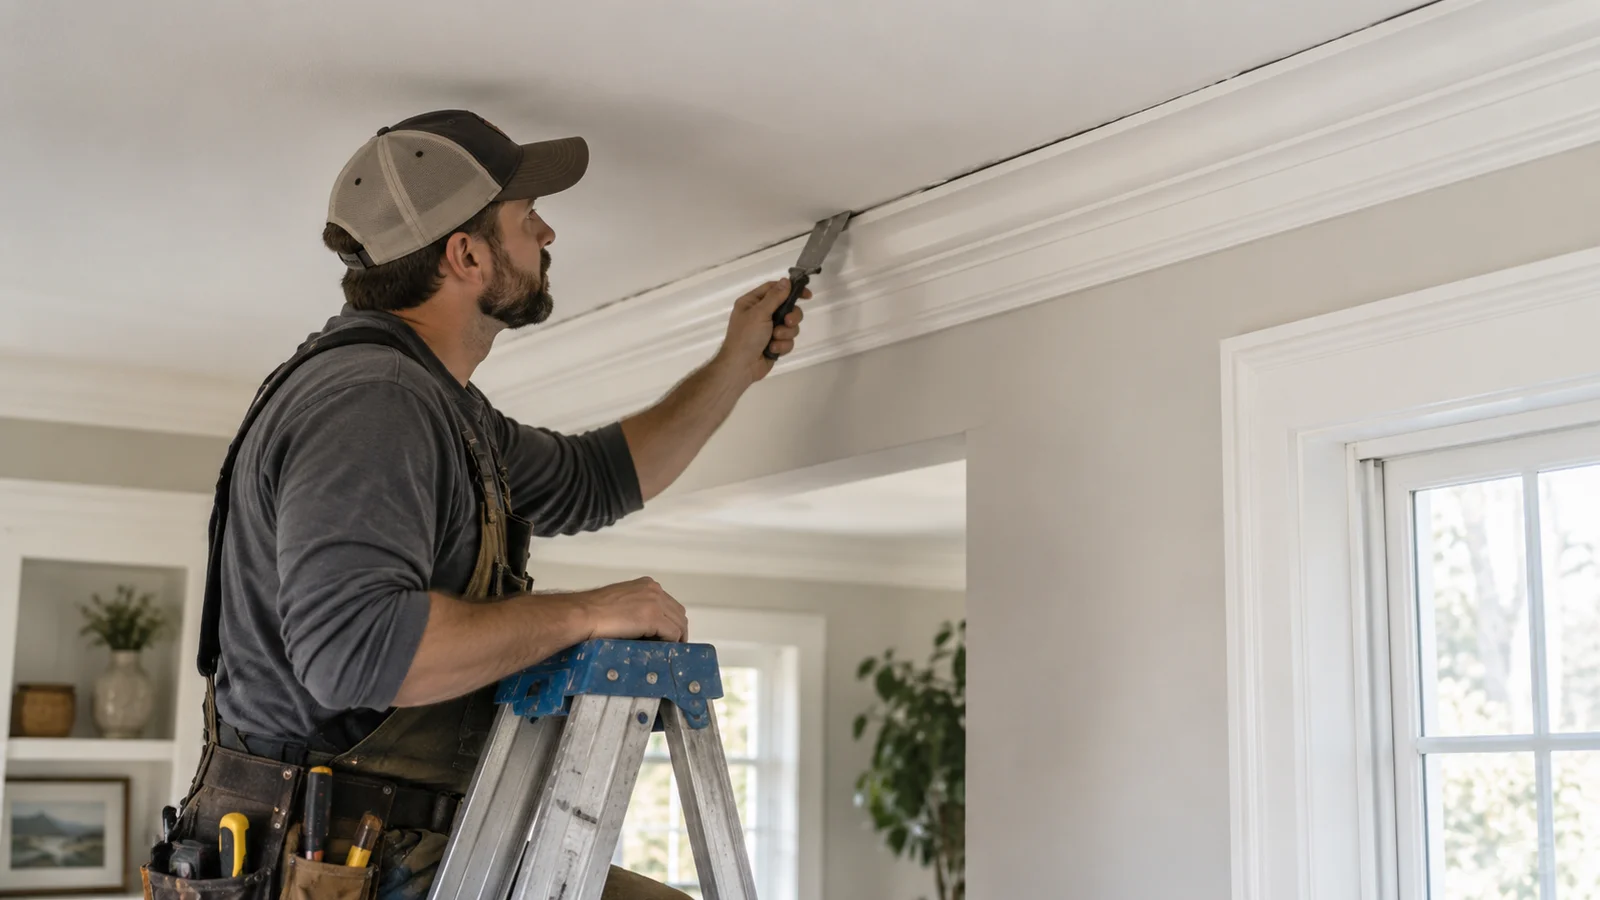
Gaps between crown molding and ceiling usually develop because the wood, framing, or surrounding materials have moved. Seasonal humidity changes can shrink the molding, ordinary house movement can open a joint, and weak fastening can pull trim away from the ceiling. A small, stable gap may need little more than flexible paintable caulk. A widening gap, loose molding, water staining, or cracks that continue into the wall deserves a closer inspection before anyone covers it.
At CTM Construction Services, our custom carpentry work includes trim and molding installation, along with woodworking repairs and refinishing. Before repairing crown molding, we look at where the gap appears, whether the molding moves, and what else is happening around it. Those details usually reveal whether the problem sits at the surface or extends farther into the room.
Why Gaps Between Crown Molding and Ceiling Appear
Crown molding sits across the joint where a wall meets the ceiling. That location brings several materials together, often including wood trim, drywall or plaster, framing, fasteners, caulk, and paint. Each material responds differently to changes inside the house.
A clean line at installation can open later if the wood shrinks, the framing shifts slightly, or the fasteners lose their hold. Sometimes the gap was present from the beginning and a thick bead of caulk hid it until the caulk dried, cracked, or separated.
The pattern matters. A thin gap running along one edge points to a different issue than an open corner joint or a section of molding hanging away from both surfaces.
Seasonal Wood Movement Is a Common Cause
Wood takes on and releases moisture as indoor conditions change. During humid periods, it tends to expand. Drier air can make it shrink.
The USDA Forest Products Laboratory explains this relationship in its guide to moisture and the physical properties of wood. Temperature and relative humidity affect the amount of moisture wood holds, and changes in moisture content affect its dimensions.
In a St. Louis home, indoor humidity can vary considerably between a humid summer and a heated winter. That cycle may open small gaps along crown molding, particularly if the material had a higher moisture content during installation.
Seasonal gaps often share a few traits:
- They remain narrow and fairly consistent
- They appear during the same part of the year
- The molding still feels secure
- Nearby walls and ceilings show no staining or major cracks
- The gap closes or becomes smaller when indoor humidity changes
Caulk can handle modest movement if the gap falls within the product’s recommended limits. Hard filler tends to crack because it can’t flex with the trim.
The Molding May Not Have Been Fastened Securely
Crown molding needs solid fastening at the correct angles. If nails miss the framing or don’t penetrate far enough, part of the molding may pull away over time.
Long pieces create another challenge. A board that has a slight bow may look tight when first installed, then work against weak fasteners. Mitered corners can also place tension on adjoining sections if the pieces weren’t fitted carefully.
Press gently on the molding near the gap. Don’t force it. If the trim moves toward the wall or ceiling, the issue likely involves fastening rather than caulk alone.
Adding another bead of caulk won’t secure a loose board. The molding should first be refastened into solid material. After that, the surface can be prepared, caulked where appropriate, and painted.
Uneven Walls and Ceilings Can Leave Irregular Gaps
Walls and ceilings aren’t always perfectly straight, especially in older St. Louis homes. Plaster may vary in thickness, framing can settle, and ceiling planes sometimes rise or dip across a room.
Rigid molding won’t naturally follow every uneven area. Installers may need to scribe or adjust the trim, use carefully placed fasteners, or correct the surface before finishing the joint.
An uneven ceiling often creates a gap that changes width across the same piece of crown molding. One section may fit tightly while another opens by an eighth of an inch or more.
Small variations don’t automatically indicate damage. They do require thoughtful fitting. Filling a wide, uneven space with a heavy line of caulk can make the molding look wavy and draw more attention to the ceiling irregularity.
Depending on the room, a better repair may involve removing and refitting the affected section. In other cases, a narrow trim detail or controlled caulk line creates a cleaner transition.
Open Corner Joints Usually Point to a Fit or Movement Problem
A gap where two crown molding pieces meet differs from a separation along the ceiling. Inside and outside corners depend on accurate cuts, stable material, and secure fastening.
Corners can open because:
- The molding shrank after installation
- The original joint never fit tightly
- One piece pulled away from the framing
- Caulk or filler concealed a poorly fitted joint
- The wall angle differs from a perfect 90 degrees
- Framing movement changed the relationship between the surfaces
Inside corners often perform better with a coped joint, where one piece follows the profile of the adjoining molding. A basic miter can open more visibly if the corner isn’t square or the wood moves.
Small corner gaps may accept a careful cosmetic repair. Larger openings usually look better after a carpenter refits or replaces the short section instead of packing the joint with filler.
Water Damage Needs Attention Before a Trim Repair
A crown molding gap paired with discoloration, peeling paint, softness, swelling, or a musty odor calls for more than caulk.
Water can enter from a roof leak, plumbing line, bathroom above, window, or condensation problem. Moisture may damage the ceiling material, loosen fasteners, or cause wood trim to change shape.
Don’t seal over a wet area. First, identify and correct the moisture source. The surrounding materials need enough time to dry, and damaged drywall, plaster, framing, or molding may require repair.
Watch for these signs:
- Yellow or brown ceiling stains
- Bubbling or flaking paint
- Soft drywall near the molding
- Swollen, cupped, or discolored wood
- A gap that appeared soon after a storm or plumbing problem
- Mold or persistent odor
A cosmetic repair will fail if water continues to enter the assembly. It may also hide a problem that becomes more expensive with time.
House Movement Can Affect Crown Molding
Houses move slightly as materials respond to temperature, humidity, soil conditions, and ordinary loading. Minor movement doesn’t always signal a serious structural issue. Crown molding often makes that movement easier to see because it creates a crisp line across two surfaces.
Pay attention to changes beyond the trim. A gap deserves closer evaluation when it grows quickly or appears alongside:
- Long ceiling or wall cracks
- Doors that suddenly stick
- Windows that stop operating normally
- Uneven or sloping floors
- Separation around several openings
- Repeated cracking after earlier repairs
Those conditions don’t confirm a structural problem by themselves. They do suggest that simply recaulking the crown molding would be premature. Document the changes and have the underlying condition evaluated.
When Caulk Is the Right Repair
Caulk works best on a narrow, stable gap between painted crown molding and a painted wall or ceiling. Choose a flexible, paintable product rated for interior trim.
The repair usually involves removing loose material, cleaning the joint, applying a controlled bead, smoothing it, allowing it to cure, and touching up the paint. Follow the product’s instructions for gap size, curing time, and paint compatibility.
Avoid filling the joint if the molding moves when touched. Caulk also won’t correct a poorly cut corner, water-damaged trim, or a gap wide enough to make the molding look misaligned.
Don’t assume that more caulk will create a stronger repair. A thick bead often shrinks, cracks, collects dust, or leaves a rounded line that looks inconsistent with the rest of the room.
For stained crown molding, caulk becomes much harder to hide. A carpenter may need to adjust the fit, add a carefully matched wood repair, or reinstall the section. Standard white or paintable caulk usually stands out against a clear wood finish.
When the Molding Should Be Refastened or Reinstalled
Loose sections need mechanical correction. That may mean adding appropriate fasteners into framing or blocking, correcting a bowed board, repairing the surface behind the molding, or removing and reinstalling the piece.
Replacement becomes reasonable when the molding has split, warped severely, suffered water damage, or lost too much material during an earlier repair. If the existing profile has architectural value, a carpenter may reproduce the damaged section or build up a matching assembly from multiple pieces.
Our guide to woodwork repair versus replacement explains how the amount of sound material and the cause of damage affect that decision. Crown molding doesn’t always need complete replacement because one joint or short length has failed.
During a broader residential remodeling project, it also makes sense to evaluate how the crown relates to new walls, cabinets, openings, and ceiling work. Planning those connections early produces cleaner lines than trying to modify the molding after every other finish is complete.
Check the Entire Room Before Choosing a Fix
Stand back and follow the crown molding around the room. Note where each gap begins and ends, whether the width changes, and how the corners look.
Next, check for movement by applying light pressure. Look at the ceiling and walls for stains, cracks, or peeling paint. Think about when the gap appeared and whether it changes between seasons.
A short inspection should answer several useful questions:
- Is the molding firmly attached?
- Does the gap stay the same throughout the year?
- Is the opening limited to one joint?
- Does the trim show warping or moisture damage?
- Are there related cracks elsewhere in the room?
- Will a caulked line remain visually acceptable?
These observations give the repair a clear direction. Stable cosmetic gaps often need flexible caulk and paint. Loose molding needs fastening. Poor joints require refitting, while moisture or broader movement should be addressed before finish work begins.
Get the Cause Right Before Closing the Gap
Most gaps between crown molding and ceiling come from ordinary wood movement, an uneven surface, a weak fastening point, or an imperfect original fit. The correct repair depends on which condition created the opening.
At CTM Construction Services, we handle trim and molding installation as part of our custom carpentry work in the St. Louis area. If the molding has pulled loose, the corners no longer meet, or a previous repair keeps cracking, contact our team to discuss the affected area.
Before scheduling the work, take a few clear photos and note whether the gap changes with the season. That information makes it easier to separate a simple finish issue from a section that needs refitting or further evaluation.
Recent Posts
How to Match New Trim to Existing Woodwork in a St. Louis Home
SEPTEMBER 15, 2026
How to Update a Home Without Making It Feel Too Trendy
AUGUST 25, 2026
Basement Conversion Ideas for St. Louis Homes
AUGUST 19, 2026
Woodwork Repair vs Replacement – What Makes Sense?
JULY 27, 2026
How Built-In Storage Can Make a Small Home Work Better
JULY 6, 2026
Newsletter
Don't miss a thing!
Sign up to receive daily news